Replacing windows is often necessary when renovating an existing room or fixing problems with an old window. There are two common ways to replace windows: pocket installations (also called the traditional method) and full-frame window replacement. You can easily install a new PVC replacement window with the right technical know-how and a few basic tools.
The Canada Greener Homes Grant offers a $250 grant per eligible window. This is another motivation to replace windows in Canada with a more energy-efficient equivalent.
Two Kinds of Window Replacement Technique
There are two types of window installation to consider when replacing windows. Each has its pros and cons, and you should carefully consider them before deciding on one.
Pocket Window Installation
Pocket installation is also known as insert window installation, retrofit, or traditional installation method. This involves inserting a full window or sash, including its frame, into an existing window frame or sill. This installation type provides cost savings but results in a smaller window space. If you need replacement windows right away, this method is done quickly.
This is advisable if the existing window frame, trim, or siding is unique and replacing it would upset the home’s aesthetics. Using this method, you can preserve a house’s character as well as a wall’s structural integrity. However, if there’s suspected rotting on the existing window frame or if it has insulation issues, then it’s best to consider full-frame window replacement.
Full-Frame Window Replacement
Full-frame window replacement involves completely removing the entire window, including the sash, casings, tracks, and the entire jamb. This shows any insulation gap, so you can redo the insulation and achieve airtight and energy-efficient windows. This also provides the opportunity to clean the opening and make sure there is no hidden moisture or structural damage.
You can also apply the newest window technologies and have windows that would last longer. However, the entire process could take time and cost more than retrofit window installation.
Advantages of Full-Frame Window Replacement
- Provides additional glass space and allows you to change the size of your windows
- Offers options for beautiful customizations like the addition of a brickmould around the window
- Inspect existing insulation and re-do as necessary
- Detect any hidden issues like rotting wood, mildew, leaks, or pest problems
- Gain more energy-efficient and longer-lasting windows
Step-by-Step Guide to install a Full-Frame PVC Window
Full-frame window replacement is like installing windows in a newly constructed house. Once the entire window is removed, you install a PVC window the same way it was done when the house was first built.
Materials Needed:
To install a PVC window, you need the following:
- PVC window
- Long screws (6-8”/15-20cm)
- Window sealant
- Polyurethane foam
You also need the following tools:
- Safety gloves and glasses
- Stud finder (for houses with wooden walls)
- Drill machinery and drill bits
- Measuring tape
- Carpentry pencil
- I-square
- Chisel
- Spirit Level
Steps to Follow:
Installing a PVC window is not hard, but it requires attention to detail and hard work. You only need moderate knowledge for this task, and it’s recommended you practice first with smaller windows, like a bathroom window, before attempting bigger ones.
Removing a window
Before installation, you need to make sure the entire window has been removed and only the rough opening is left. Remove all the fasteners, such as brickmould fasteners, through-the-jamb fasteners, installation flange fasteners, and the like. Remove installation clips and any foam insulation. Remove the interior trim and extension jambs. In case there’s a sealant bond behind the brickmould or flange, release it.
Here are the basic steps for removing a window:
- Remove window stops.
- Remove the lower sash followed by the upper sash.
- Remove trim and casings.
- Remove sill and frame.
- Expose the rough opening.
Inspect the existing rough opening for any structural damage and repair as needed before installing the new window.
Once the window removal is complete, follow the installation steps below.
Installing a PVC window
Window manufacturers have their own installation guides specific to their windows. It’s best to consult these guides for specifics. However, there are general principles applicable to installing any PVC window.
Before ordering any PVC window, measure the window opening dimensions at least twice. Take the width and height of all the sides of the opening. When ordering the windows, use smaller dimensions to anticipate curved walls.
Pro Tip: For new constructions, subtract 0.5 inches from each window side. For replacement windows, subtract 0.25 inches.
Once the ordered windows arrived, you are now ready to install them. Here are basic installation steps applicable to all PVC windows in general. Always check with your manufacturer’s instructions before attempting a window installation.
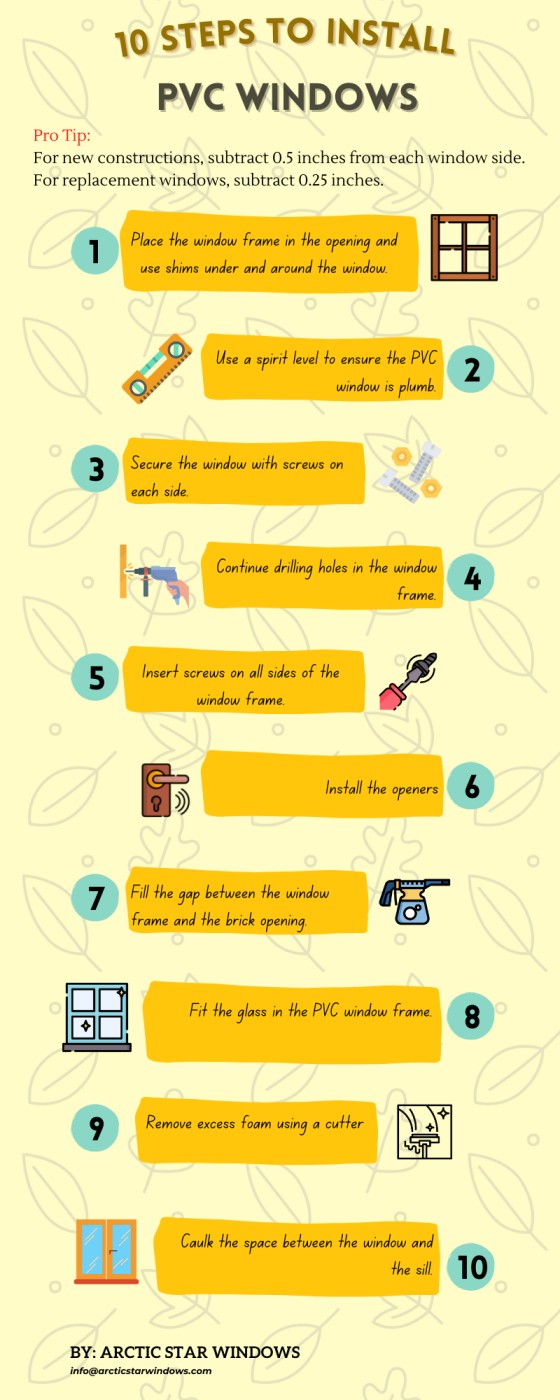
- Place the window frame in the opening and use shims under and around the window.
Shims are important to ensure the window frame is spaced out evenly on all sides. New construction requires a larger gap of half an inch, while replacement windows only require a quarter of an inch gap.
- Use a spirit level to ensure the PVC window is plumb.
The window needs to be placed symmetrically in the opening to align with the walls. This is important to avoid reworks in the future.
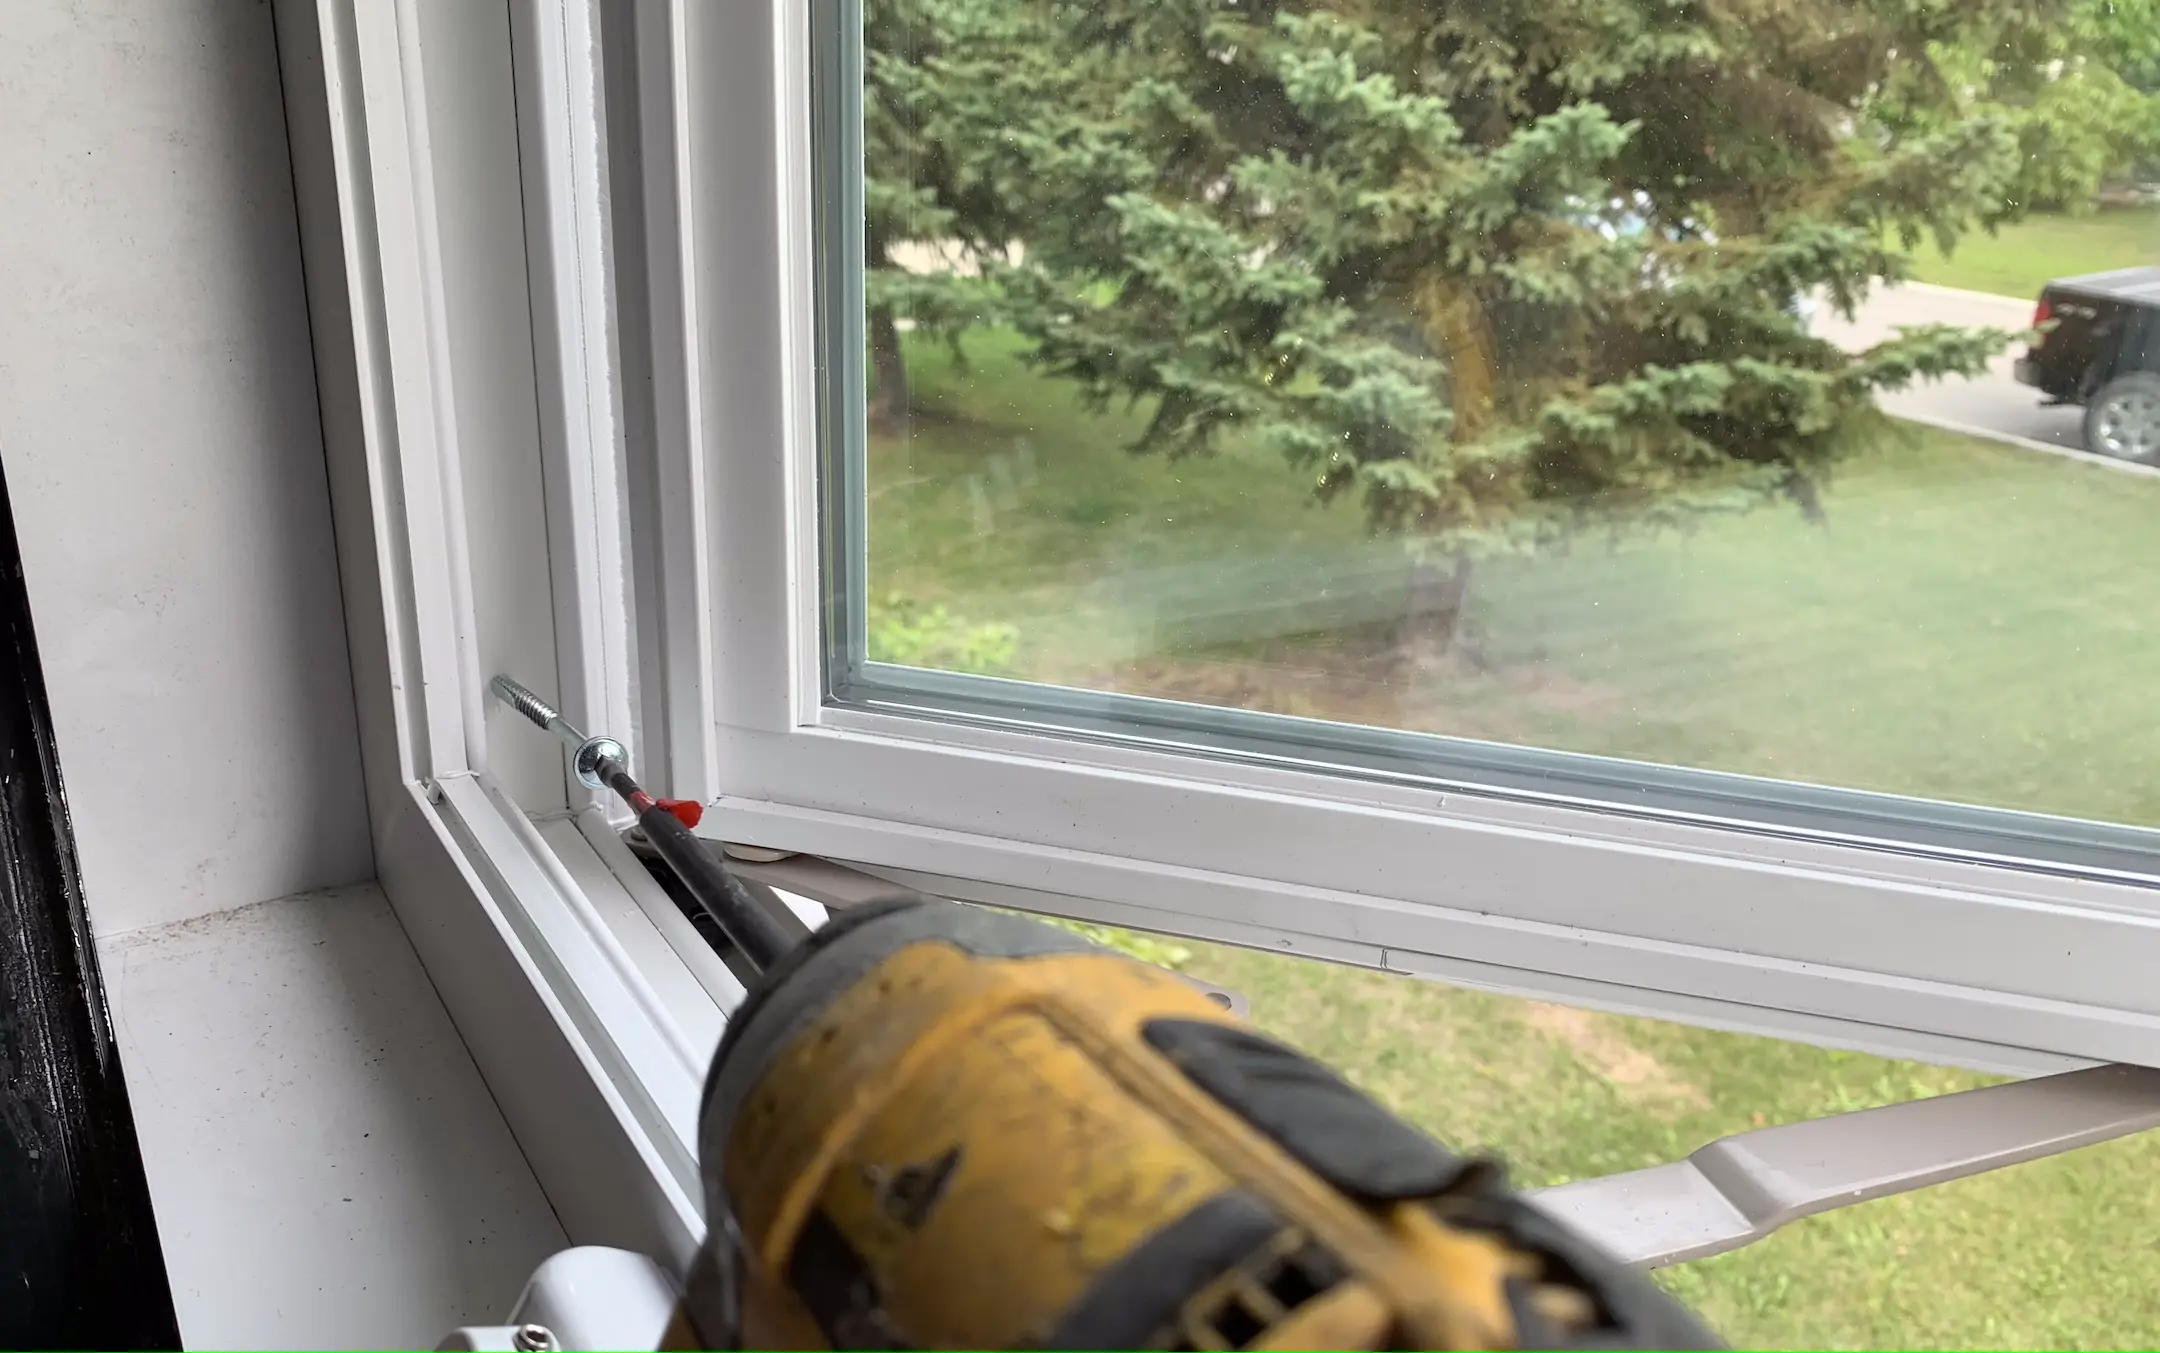
- Secure the window with screws on each side.
Once the window is aligned, use at least 2 screws on each side to secure the window. Use the right drill machinery for concrete or wood.
- Continue drilling holes in the window frame.
With the window frame secured, you can proceed to drill holes in the rest of the frame. Always use a spirit level to check if the window is plumb and aligned with the wall.
Pro Tip: Don’t over-tighten the screws to avoid damaging or bending them. Be patient. Aligning the frame and inserting the screws is the key step in window installation.
- Insert screws on all sides of the window frame.
The screws will secure and lock the PVC window to the wall.
Pro tip: Don’t use screws smaller than 6-8 inches (15-20cm) long, as these won’t protrude on the brick layers or wood studs and pose a potential danger.
- Install the openers.
These are the parts of the window that open. Connect them with the hinges and drive in several screws as needed. Check the manufacturer’s guide for specific instructions as this step varies from window to window.
At this point, you have almost completed the project and the hard part is over.
- Fill the gap between the window frame and the brick opening.
Use a good quality sealant or polyurethane foam and apply it to the whole frame. Do this properly to ensure that moisture and cold won’t get in the house. Windows must be properly insulated against the cold Canadian weather. You can’t afford to have windows with poor thermal insulation.
- Fit the glass in the PVC window frame.
Glasses come separately from the frame to prevent scratches during transportation. Once the sealant is dry, you can install the glass inside the frame and secure them with plastic rods.
Remember to always use a spirit level to keep the frame plumb and aligned with the wall.
Install the interior rod to secure the glass and press it with your fingers to ensure they attach properly. Check that the glass locks into position.
Pro Tip: Place the glass on a soft material to reduce the risk of scratching it. Use countersink screw heads in the frame to ensure the glasses fit.
- Remove excess foam using a cutter.
When the foam dries out, you can clean it up by cutting the excess. If you’ve used a sealant, ensure it doesn’t spill around the PVC frame, as it can obstruct drainage inside the window.
- Caulk the space between the window and the sill.
Do this for both inside and outside the window to seal against any air leaks. We recommend using silicone.
Window Replacements in Winnipeg
Replacing windows is normal, especially for homeowners who are moving towards a greener and more energy-efficient home. The process is simple and achievable by any DIY-er. However, if you’re in doubt, you can always get in touch with window companies for assistance.
Arctic Star, one of the leading window companies in Winnipeg, offers window replacement and window repair services. We use ENERGY STAR® certified windows that qualify for the Canada Greener Home Grant.
Whatever your reasons are for replacing your windows, we recommend consulting with experts who can help you achieve energy-efficient windows that will last years. Contact us for a free quote today. We guarantee that our window prices are direct from the manufacturer and are affordable without sacrificing innovation and quality.
Geri Mileva
Contributing writer